Join us March 11 at the Appleton SCHEELS for a food plot and trail camera seminar from 6 pm – 8 pm.
Registration is $10; each attendee will receive a $10 SCHEELS gift card.
Click here to register.
Join us March 11 at the Appleton SCHEELS for a food plot and trail camera seminar from 6 pm – 8 pm.
Registration is $10; each attendee will receive a $10 SCHEELS gift card.
Click here to register.

Are you fully prepared for the upcoming deer hunting season?
If your answer is somewhere between ‘not really’ or ‘not at all,’ you’re in the right place. Get ready to find out all there is to know about prepping your hunting land.
Whether you’re an experienced hunting landowner or you’ve just bought some land, and you’ve no clue how to prep it, don’t worry; I’ll cover it all. You’ll see that it doesn’t matter if you’re prepping it to enjoy the hunting season yourself or you want to lease your land, just follow my advice, and you’ll have a bountiful deer hunting season.
To get the entire gist on how to fully prep hunting land for the deer hunting season, keep on reading and make sure to follow these few essential steps.
Do you hate it when annoying bushes or overgrown plants get in your way while hunting? We all do, understandably so.
Struggling with such obstacles during a hunt is not only a real nuisance, but it can also seriously affect the end result of your hunt. When you step on an old, dry branch or parched leaves, it can scare away your game. Few things ruin a hunt faster than getting tangled in briers or tripping over a large shrub.
So, naturally, you must clear all the travel paths on your land. You have to ensure you’ll be able to move quickly and quietly once the hunt begins.
Clearing the paths of natural inconveniences such as bushes, briers, and leaves is a must. But you ought not to forget all the rubbish that found its way on your land. Don’t think of it only as clearing a way for a successful hunt; it’s also crucial for environmental reasons.
There’s another benefit to making sure all the travel paths on your land are crossable. You’ll have a backup path if something unanticipated happens and you have to unexpectedly change your route. For example, strong winds or unforeseen weather changes can make your planned road suddenly impassable. This way, you won’t be caught off guard if it comes to that.
Finally, lest we forget that deer prefer to take the path of least resistance, so they might just make your cleared paths their own and stumble right into your arms.
It’s time to adopt the boy scouts’ motto as your own and always be prepared. When it comes to prepping your hunting land for the deer season, the essential step is scouting the land. You have to find out all you can about the land and the deer that travel on it. Gather all the knowledge you possibly can, and don’t let anything surprise you. Being prepared for what may come your way is the key to a triumphant hunt.
Try answering some questions regarding your game. These include:
These are just some of the questions you need to ask to prepare yourself and your land for the deer hunting season. Getting comprehensive answers to all of them will give you a massive advantage over your prey – you’ll always be a step ahead, and they won’t know what hit them. Plus, this way, not a lot of things can take you by surprise.
Get your hiking boots and take a long walk on your property. If possible, print out a satellite image of your land beforehand so you can make a detailed analysis and mark your findings for future hunts.
Many hunters tend to disregard trail cameras as an unnecessary expense. However, if you ask some of the most seasoned deer hunters, they’ll tell you there is something useful to them. Namely, trail cameras can be a result of clever strategic thinking.
They can provide you with full info on the deer traveling through your land. You can find out where they move, how many there are, how big or small they are, and so forth. What’s more, trail cameras will substantially increase your chance of intercepting a big buck early in the season.

When you finish scouting your land, it’s time to set up stands. Once you figure out which are deer hot spots, you have to mark them somehow. There are a few tips and tricks that can be particularly helpful in this part of land prepping.
When it comes to hanging tree stands, keep in mind there isn’t an exact rule regarding the height at which you’ll set them. It largely depends on the terrain of your property. An excellent example to follow would be setting up the stand high enough to not be in the deer’s direct scent path. In addition to this, you also want to clear out enough limbs around you so you have enough coverage to break your outline.

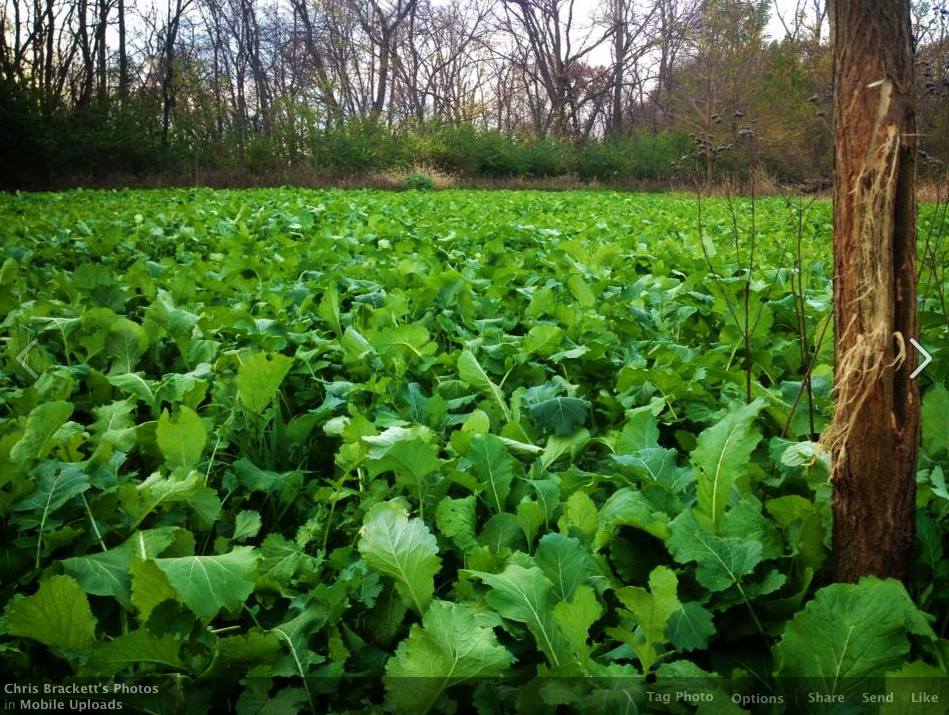
The last – but certainly not least – thing that you should do is to plant food plots.
Be mindful; you can’t do it haphazardly. Planting food plots requires serious thinking, a lot of maintenance, and special attention. The first thing to do would be to collect a soil sample and test it. If it’s not in the right condition, the soil will have to be treated before planting.
The good news is that there’s a variety of seeds suitable for food plots. You can plant oats, wheat, turnips, alfalfa, sugar beets, sunflower, forage soybeans, and many more.
It pays to know a couple of things when planting food plots. First of all, know that deer are more attracted to food plots during daylight if they are smaller in size, so having more small plots is more beneficial than having one large plot.
Secondly, be prepared to spend time taking care of the plots. That means regular mowing, frost seeding, renovation, and adequate watering.
If taken care of properly, food plots can be an economical source of food for deer on your land.

Guest post contributed by Chris Rice.
With so many seed options available now, you might be wondering what’s the difference between them all. A seed is a seed, isn’t it?
We don’t think so. We think there’s a lot more to consider when growing a food source for your deer. Here’s what HB Seed focuses on to help our customers get the biggest ROI from their food plots.
Have you ever paid close attention to the label on your food plot seed? Oftentimes there is a date stating when the seed was tested and bagged. The older a seed is, the more likely it has been exposed to things like moisture and is less likely to germinate.
Speaking of germination – most people think the “germination rate” is what percentage of the seeds will grow. This isn’t the case. By USDA definition, germination only means the seed cracked, not that it turned into a plant. Keep this in mind when you see that something says it has a high germination rate. Older seeds might crack – technically germinate – but they might never emerge from the soil. Seed that is fresh will crack, grow, and be above ground in 2-3 days. This is why we only sell the freshest seed.

If you have any older or leftover seed around, try a simple DIY germination test before you waste time planting it. Take 10 seeds and fold them inside a moist paper towel, then let them sit for a few days. Check on them each day and you will see if the seeds are still viable. The older the seeds are, the fewer seeds you’ll see germinate.
Do you like eating the same thing all day every day? Probably not. Deer are the same way. The HB Seed blends are all designed to give deer the variety they crave along with the nutrients that are most important – protein and carbs.
If you like having both spring and late summer plots, there’s another benefit specific to using perennial/annual blends. When you initially plant your plots for the fall, you can expect to have a good variety of plants come up in time for fall. Then, when spring arrives, all the perennials will sprout again, saving you time from having to plant twice.
Some seed companies coat their seed. There’s nothing wrong with this – the coating is meant to give each seed a little extra nutrient boost when it first germinates.
That extra coating also takes up space in the bag, though. So, when you’re buying 4 lbs of coated seed, there’s a lot less seed in that bag than in a 4 lb bag of an HB Seed blend. Consider this when comparing seed – a 4 lb bag of our uncoated seed is likely going to cover more acreage than a 4 lb bag of coated seed. Remember this when it comes time to plant if you’ve traditionally used coated seeds in the past. The broadcast recommendations on our bags ARE correct, so beware of overseeding!
Our belief is that if you take the time to do your soil test and ensure your soil conditions are right, that will pay far more dividends than purchasing coated soil. Proper soil conditions + fresh seed = quality food plots.

Have you ever tried to call a company’s customer service line to ask a question? If you got bounced around from agent to agent, not only did you not get helped, you probably are now going to purchase from someone else in the future, and worse, you’re probably less willing to ask for help when you have a question.
Take a look at the back of your HB Seed bag. You see the contact info listed? That’s the direct contact information for the guru himself, HB Seed owner Doug. His motto is, “When it comes to food plots, there’s no such thing as a dumb question,” and he will walk you through what you need to know. Educating the customer is the foundation of the HB Seed customer service philosophy.

The best way to reach him? Text first. If the sun is up, he’s probably on a call. He will get back to you. You can also either email, use the form on our website, or message us on social media and we’ll work to get you an answer to your questions. You can even leave a comment right here, at the bottom of this blog!
Are you ready to see for yourself what makes HB Seed different?
Some people like to use mineral supplements to help deer survive the winter. Some just want to attract more deer to their property. And of course, everyone hopes it will help them grow bigger bucks. But not all mineral supplements are created equal. Here, we’ll breakdown some of the top factors when considering your mineral options and how to best use it.

It may seem obvious, but deer are a lot like us in that they get their nutrition from what they eat. Unlike us, though, their choices are much more limited, especially in the winter months. Even with access to a variety of foods, we know that we as humans still have nutritional gaps, so we often take supplements. To help cover those nutritional gaps for deer, this is where mineral supplementation comes in.
While most people think of mineral as a way to help bucks grow bigger antlers, we take a broader-picture approach. Those big bucks start out as little bucks, which start out as fawns. By supplying high-quality mineral to your entire herd in the winter and early spring, you’re not only assisting the health of your bucks AND does; you’re also giving fawns a jump-start to their development. This will then lead to both bigger-antlered bucks this year as well as establish a great foundation for a healthier herd in the long term.

If you’ve purchased mineral before or looked at the ingredients, you’ve probably seen that salt is often one of the top ingredients. In fact, many people just look for salt rocks, blocks or “licks,” knowing that the salt alone will draw the deer in. While salt is important for attracting deer, it offers little nutritional value on its own. Our Booner Max mineral contains 17.5-20.5% salt content, leaving room in the bag for more important minerals like calcium, phosphorus, magnesium, potassium, and more. If you’re using mineral with over 30% salt content, you’re missing out on providing your deer with better nutrition during the critical winter months.
Booner Max was formulated with the help of wildlife biologists and tested in controlled environments. In addition to a wide variety of minerals, Booner Max also includes sea kelp to reduce and regulate the deers’ body temperature, and probiotics to help them digest and utilize those minerals to maximum efficiency. This combination makes a major difference in deer health and antler growth. Our customers have seen as much as 30-40 inches of antler added year over year from 3 ½ to 4 ½-year-old bucks in the wild. Oftentimes bucks will produce additional tines, split tines, drop tines, and stickers galore at the base of the antlers that were not there at all in previous years. Besides bigger antlered bucks, you can expect to see a healthier-bodied herd as a whole, too.


State and local laws vary, so please be sure to check your regulations before placing mineral.
Our ideal recommendation is to locate an area near water and a bedding area. Find an old stump to pour it on/in, and pour 25 lbs at that location. Alternatively, you could simply clear any vegetation, dig a shallow hole or loosen some dirt and mix the mineral in. The amount of mineral sites is dependant on the size of your herd, but a good rule of thumb is two mineral sites for every 40 acres. To optimize antler growth, winter and early spring are the most critical times to supply mineral to your herd and is also when you will see the most mineral consumption. We recommend replenishing your mineral sites twice a year – you can replenish more often as needed. Again, laws vary from state to state and even county to county, so please be sure to check that you’re in compliance with your area’s laws before placing any mineral.

Incorporating mineral sites is a great way to enhance your current land management strategy. Are you ready to start growing the booners of the future on your property? Get your Booner Max today!
Have you heard about Liquid Lime yet? It’s a game-changing product for food plotters. Liquid Lime from Plot Dr. is not only an alternative to hauling in bags and bags of ag or pelletized lime, it can also adjust your soil pH FAR more rapidly than other forms of lime. This is a great time and money saver for many food plotters. But with anything new, there’s a lot of questions that come along with it. We did a Q & A with Kenton from Plot Dr. to give everyone insight into how a product like this can improve the groceries your plots produce this fall.
So, what is Liquid Lime?
Liquid Lime is a micronized form of calcium carbonate (lime) suspended in a surfactant. It is no different than ag lime when we look at the chemical makeup. The difference is that in Liquid Lime, the particle size is smaller and there is better purity.
How is Liquid Lime different from other forms of lime, such as ag lime?
Lime is a mined product of the earth, so consistency tends to be a limiting factor when it comes to use of conventional lime products. Once mined, lime goes through a screening process to separate it based on particle size. When you hear the terms such as 60-69 or 80-89 that tells you the grade of lime – the higher the number, the smaller the particle size. Pelletized lime is basically ag lime that has had a polymer added to make pellets easier to use by the consumer. It also tends to have smaller particle size. Plot Dr. Liquid Lime particle size is all a consistent 2-micron particle size. With ag and pelletized lime, the larger particle sizes mean they take longer to break down in the soil; Liquid Lime’s tiny particle size means it provides almost instant results.
How do you recommend using Liquid Lime?
Liquid Lime is a product that you are going to spray onto the soil surface. So, after you have prepped and planted, you would go and spray this product over the top and let rain or irrigation move it through the soil profile. The goal is to affect the top several inches where most of our seeds are planted and where most of the roots will be occupying space. Remember, lime is about more than just changing pH. Roots do not grow without calcium and we are supplying calcium with every application of lime. This in itself can be very beneficial for plots.

Does this work with any sprayer? Are there precautions I need to take?
This product will work in any device that sprays liquid. There are some instances where the sprayer is not set up to spray material like liquid lime because they come with small nozzles, screens or filters – typically, store bought ATV or smaller 3-point sprayers. They are designed for spraying herbicide and not liquid lime. Removing screens and using larger nozzles will ensure problem-free spraying.
As far as procedure goes, premixing your Liquid Lime is the easiest. A 5-gallon bucket, cordless drill, and a paint mixer work very well in doing this. Fill your sprayer with the desired amount of water to cover your acreage minus about 4-5 gallons. Take a 5-gallon bucket and put about 3 gallons of water in it. Then, add your lime (we will say a gallon) and mix it up with your paint mixer or any kind of mixing device. Then add this lime slurry solution to your sprayer and you’re ready to spray.
Note from Doug: Remember to rinse your sprayer out when you’re done!
What if my soil pH is really bad? Can I use multiple forms of lime?
Yes, you can if you want. We use a term called instant gratification a lot when it comes to Liquid Lime. If you have a new plot or one you haven’t had any success growing a lush crop on and you figure out you need lime, ag lime or even pelletized lime are not going to get you the results you want in a single season. They are slower working products. A good solution may be to adjust rapidly with Liquid Lime and then supplement with ag or pell lime for extended results.
How often does liquid lime need to be applied?
It is an annual use product. Liquid Lime can adjust your pH within a matter of days, but your soil will also buffer back over time sooner.
How does the cost of Liquid Lime compare to other lime sources?
Cost is ultimately dependent on results in a lot of cases. If you have large enough plots where an applicator can come in and apply ag lime for you (10-20 acres) it is probably cheaper to go that route. If you don’t have the means of spreading ag lime and you buy pelletized lime, you will end up spending around $175-350 an acre if you use the needed amount; it’s rare anyone uses the needed amount of pel-lime because of the price. Depending on your soil needs, most people can use Liquid lime for $40-80/acre per year.
What other benefits are there to liquid lime?
We put Liquid Lime in the hands of food plotters because it works! Using the right tool for the right job is what we tell food plotters and, in many cases, Liquid Lime is an excellent tool. Most of us have a limited amount of time to pursue our hobbies and passions as outdoor enthusiasts. Liquid Lime helps you be efficient so you can ultimately provide a better food source for the wildlife you pursue.

Not sure if you need Liquid Lime, or how much you might need? Best way to find out is with a soil test. You can also check out this video for more details about soil testing and the food plotting process. Thanks to Liquid Lime, it’s not too late to adjust your soil pH and get your healthiest soil – and your healthiest plots – yet!
Still have more questions? Leave a reply to this post!
Thanks again to Kenton from Plot Dr. Be sure to follow Plot Dr. on Facebook. Special thanks to Working Class Hunter for the photos. You can keep up with them on Facebook, Instagram, and a whole bunch of other places – check their website for more.
HB Seed Co. and Scrape Line Hunters teamed up with Plot Dr. and Ag Source Laboratories to create this video covering:
If you have questions about any of these topics, be sure to check it out!
Did you catch Doug’s interview in March with Jayson Sacco on his podcast Outdoor Adventures with Jayson? Be sure to check it out. They discuss food plotting from beginning to end from the perspective of someone new to the process.
Jayson’s podcast episodes cover topics ranging from North American white tail and bear hunting to African safari’s. Learn more about Jayson and subscribe to his podcast on his website.

Have you ever asked Doug for advice on what to plant in your plots? I’d bet money I know what the first thing he’d ask you is.
Ummm…
Not sure? Not sure how to find out? Don’t worry, we got you.
Soil tests are so important to the success of your plots. They spell out for you exactly what you need to get the groceries you’re looking for. Even the freshest of seeds won’t grow to it’s full potential if soil conditions aren’t juuuuust right. Instead of guessing what your soil might need, wouldn’t you feel better if you knew EXACTLY what it needed? That’s where soil tests come in. Here we’ll explain everything you need to know and do to collect a soil sample and send it in for analysis.

You’ll only need to take the bucket and the soil probe/shovel when you head out to your food plot site. We suggest you take a minimum of five samples from each food plot site: one from each corner and one from the center. You will put all five of these samples into the same bucket, mix them together, and then take some of that soil to submit for your sample for that plot location. Do NOT mix samples from multiple plot sites, though.
You’ll want to go about 4-6 inches into the soil to collect your samples. If you’re using a soil probe, it will likely have marks on the back side that you can use for reference.

First, clear away debris from the area you’d like to collect a sample from. Then, push your soil test probe into the soil, give it a twist, and pull it back up. Finally, knock that soil out into your bucket using a stick, and move onto the next spot. Once you’ve done this five times for that plot site, you have your full soil sample for that location.

Don’t have a soil test probe? No worries, you can accomplish the same thing with a shovel. Ideally, we suggest doing this with something like a garden trowel, but you can make it work without. Basically, you just shovel out a small hole, then scrape the edge of the hole with the shovel. Then place a length of that sample into your bucket. Repeat four more times.


Once you have all your individual samples from one food plot in your bucket, go ahead and stir it all up. You will then take a portion of this entire sample and submit it for testing.
Essentially, what you’re submitting is an average for the entire plot site. Remember that this is just for one location; be sure to not combine individual samples from multiple sites. This could drastically skew your results.
Ok, so now you’re ready to send in your soil sample. Remember that test kit? When you open that up, you’ll find two sheets of paper, a bag to put the soil in, and an envelope to put the sample bag and paperwork in for mailing.

Now you’re going to need to fill some paperwork out. You’ll notice that some of the fields on the soil sample bag and the information sheet match up. For example:

It’s pretty self explanatory. An account number will be listed on the form; write that number on the first line of the soil sample bag. Include your name. Be sure to come up with a name for the plot location (Bob’s plot, or Plot A, or whatever you want to call it). You’re sample ID will be 1 unless you had a 5+ acre plot that you divided into smaller sections.
You’ll also notice on the information sheet there’s a section to check off what you intend to plant in that plot next. If you know, great! Mark it off and you will get specific recommendations for that seed blend in your results. If you’re not sure, just check Big Racks.
For the sections “Previous Crop,” “Soil Type,” and “Tillage & Depth,” if you don’t know, it’s ok to leave them blank.
That’s it! Include your $18 cash or check in the envelope with the information sheet and soil sample bag, and drop it in the mail! You can expect your results soon!
We’ll explain how to read your results in an upcoming post. In the meantime, if you still have questions, leave us a comment on this post!
Got more specific questions? Join us April 26 at Stadium View in Green Bay for a night of food, drinks, prizes, and food plot knowledge. Reserve your spot here.
Hey, thanks for sticking around to the end! Use code HB10OFF for 10% off your next order. Happy shopping!

When it comes to food plots, we get a lot of questions about what to do, when. And we get it! It gets confusing. There’s spring plots and there’s summer plots; there’s small kill plots and there’s big food plots. All of these need to be handled differently. And then there’s soil tests, weed control, fertilizer, what KIND of fertilizer… oof!
It’s ok. We’ll walk you through a basic timeline, and then over the next few months we’ll dive deeper into some of these specific steps. Refer back to this as the year goes on to stay on track with your plotting plans. *Note* We do realize this may vary based on where you’re located. If you have specific questions, don’t be afraid to reach out.
Of course, fertilizing and planting are not just two simple last steps and then you’re done. There’s disking, rolling, and making sure you’re not over/under seeding too. Equipment varies, as does the blend you’re planting; we’ll get into those details in another post.
Simple enough, right? Just remember, once you have a location established, the key steps are these: soil test, weed control, fertilize, plant. Oh, we almost forgot…

Got more specific food plotting questions for Doug? See the full schedule of upcoming seminars here. Or simply comment on this post!